St Patrick’s Day Garland
Last Updated on August 2, 2017 by lydiaf1963
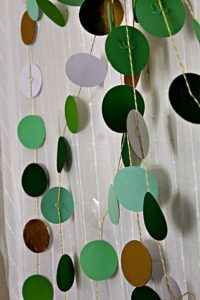 When I was researching how to make my Shamrock Door Hanging I came across a set of pins where someone had cut out a bunch of circles in various colors and used a sewing machine to make long strips for a garland. They were very cute and since I had all the paper I needed, plus a 2 inch circle punch (used to make these cupcake toppers), I thought I could make my own. In addition to the green paper used for the shamrock, I added some white as well as more gold from my dwindling supply of paper plates (I’ll have to resupply the next time I see them).
 I am really happy with the end results, but not so much the photos. When I worked on this project and the Shamrock it was pretty gloomy. The photos are uninspired and poorly lit, but I hope you’ll be able to imagine this or something similar hanging in your home, in celebration of St Patrick’s Day or perhaps in different colors for a party.
The upside to this is while working on the garland, I took the opportunity to create some video. Guess what? It’s not as straightforward as pushing the record button on the camera, but since I was so disappointed with the photos, I figured I might as well push forward with learning how to edit my videos. To my surprise I enjoyed it more than I thought I would, even though my previous video attempts were exercises in frustration. This time, instead of thinking, “I hate this and don’t want to do it” I had more of a feeling that, “Yes, I can do this! It’s fun and creative, not torture!” You’ll see the video below, but first I want to describe how to make the garland.
It’s just a set of circles attached to lengths of string. The length of the strings and distribution of the circles on each piece is up to you. I cut out about 100 circles in different colors and attached them to roughly 4 foot pieces of string a couple inches apart. Even with 8 pieces of string I didn’t use all of the circles.
 The separate lengths are like crepe paper streamers: they can be taped to the wall,tied off to curtain rods or draped in a pleasing manner. That’s how I created the background for my Shamrock. You could fashion a topper and attach the lengths so they hang like wind chimes as demonstrated in the video. I traced around a roll of masking tape for the cap. In retrospect I wish I’d made larger circles, something to keep in mind for future projects.
Two things regarding esthetics: 1) if it bothers you to see little blobs of glue I suggest using a different adhesive; 2) even though I cut the cap pieces by hand, I don’t recommend doing that for the smaller circles used to make the garland. My punch (affiliate link) made much nicer cuts than I could and I imagine those of you with a cutting machine could do this even more quickly.
Clear as mud? Hopefully the video will help.